

There are more than seventy-five different CSS selectors available to us. This article will discuss the most common and useful ones and explore when you might want to use them in your projects. We'll start with the basic ones and move up to the more complex ones, so if you have no experience with CSS selectors, this is a great place to start!
Using CSS selectors effectively will help you write cleaner and more maintainable code. CSS selectors point to an HTML element so that CSS rules can be applied to that element and its children. This tutorial will teach different CSS selectors to help you better organize your code and manage your stylesheets. Let's get started!
Universal selector🐱💻
The universal selector, represented by an asterisk \( (*)\), is used to select any element on a page. So, if you wanted to make all the text on your page bold, you could use the universal selector like this: * { font-weight: bold; }. The main downside to using the universal selector is that it can adversely affect performance because it's very broad. Basic Syntax:
* {
  text-align: center;
  color: blue;
}
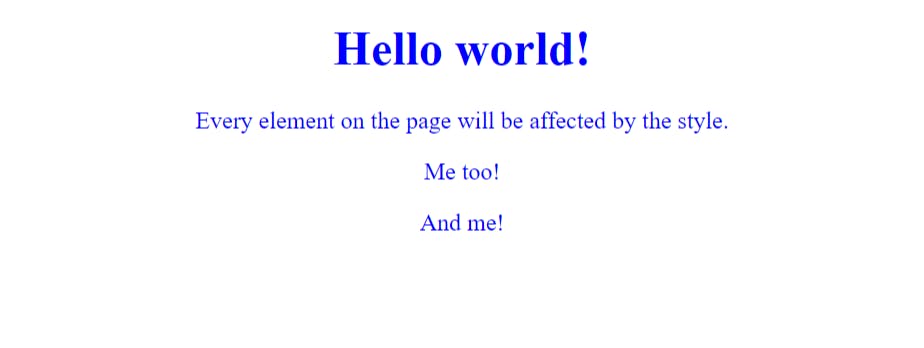
The following example can select all the elements:
<!DOCTYPE html>
<html>
<head>
<style>
* {
  text-align: center;
  color: blue;
}
</style>
</head>
<body>

<h1>Hello world!</h1>

<p>Every element on the page will be affected by the style.</p>
<p id="para1">Me too!</p>
<p>And me!</p>

</body>
</html>
Output:
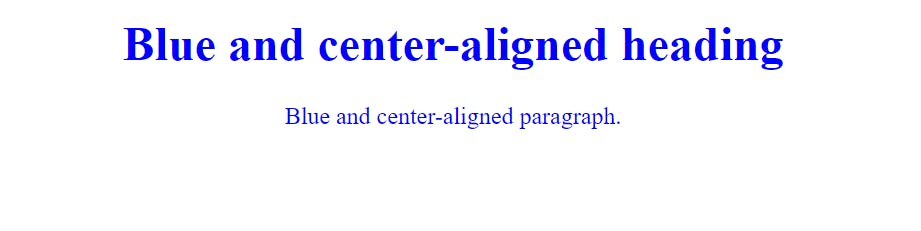
Class Selector🐱👤
In CSS, a class selector is a name preceded by a full stop (.) representing an HTML element's class attribute. The class attribute can be used on any HTML element. You can also use multiple class names on the same element, separating each class name with a space. The style rule will affect all HTML elements in the document that have the same class attribute value.
Basic Syntax:
.center {
  text-align: center;
  color: blue;
}
The example is given below:
<!DOCTYPE html>
<html>
<head>
<style>
.center {
  text-align: center;
  color: blue;
}
</style>
</head>
<body>

<h1 class="center">Blue and center-aligned heading</h1>
<p class="center">Blue and center-aligned paragraph.</p>

</body>
</html>
Output:
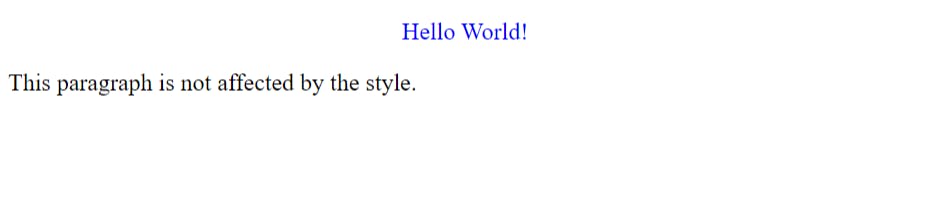
Id Selector🐱🏍
The ID selector selects an element based on its unique id attribute value. We use the id selector followed by the id value to select an element with a specific id. The id value must be unique within the document. We can only use one id selector per page.
Basic Syntax:
#parag1 {
  text-align: center;
  color: blue;
}
The example is given below:
<!DOCTYPE html>
<html>
<head>
<style>
#parag1 {
  text-align: center;
  color: blue;
}
</style>
</head>
<body>

<p id="parag1">Hello World!</p>
<p>This paragraph is not affected by the style.</p>

</body>
</html>
Output:
Type Selector🐱💻
A type selector is the most basic type of CSS selector. It is used to select an element based on its name. For example, if we wanted to select all p elements on a page, we would use the type selector p.
Basic Syntax:
p {
  text-align: center;
  color: blue;
}
The example is given below:
<!DOCTYPE html>
<html>
<head>
<style>
p {
text-align: center;
color: blue;
}
</style>
</head>
<body>
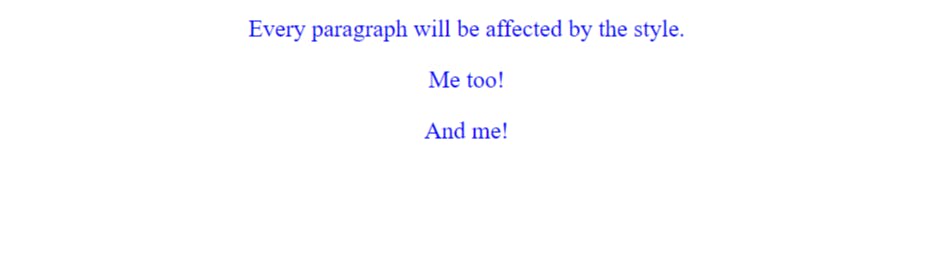
<p>Every paragraph will be affected by the style.</p>
<p id="para1">Me too!</p>
<p>And me!</p>
</body>
</html>
Output:
Grouping Selector🐱🏍
A grouping selector is used to select multiple elements and style them together. To do this, list the element selectors you want to group, separated by commas. For example, if we wanted to style all h1 headings and paragraphs on a page, we could use the following grouping selector: h1, p { }
Basic Syntax:
h1, h2, p {
  text-align: center;
  color: blue;
}
The example is given below:
<!DOCTYPE html>
<html>
<head>
<style>
h1, h2, p {
  text-align: center;
  color: blue;
}
</style>
</head>
<body>

<h1>Hello World!</h1>
<h2>Smaller heading!</h2>
<p>This is a paragraph.</p>

</body>
</html>
Output:

Pseudo-Selectors🐱👤
These are generally two types of pseudo-selectors:-
1. Pseudo-Element selctors
These selectors are used to style specific parts of the document tree that can't be selected using regular element selectors. For example, the::first-letter pseudo-element selector can be used to add a special effect to the first letter of a paragraph. Similarly, the ::before and ::after pseudo-elements are often used to create content before or after an element's content.
Basic Syntax:
p::first-line {
  color: #ff0f00;
  font-variant: small-caps;
}
The example is given below:
<!DOCTYPE html>
<html>
<head>
<style>
p::first-line {
  color: #ff0f00;
  font-variant: small-caps;
}
</style>
</head>
<body>

<p>You can use the ::first-line pseudo-element to add a special effect to the first line of a text. Some more text. And even more, and more, and more, and more like lorem ipsum dolor sit amet, consectetur adipiscing elit, sed do eiusmod tempor incididunt ut labore et dolore magna aliqua. Ut enim ad minim veniam,</p>

</body>
</html>
Output:

2. Pseudo-Classes Selectors
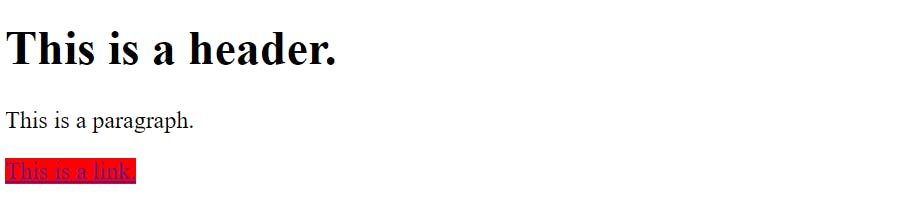
A pseudo-class is a keyword added to a selector that specifies a special state of the selected element(s). For example, :hover can change the color of a button when the user's mouse hovers over it. Several different pseudo-classes are available, each with its specific use case.
Basic Syntax:
a:hover {
  background-color: red;
}
The example is given below:
<!DOCTYPE html>
<html>
<head>
<style>
a:hover {
background-color: red;
}
</style>
</head>
<body>
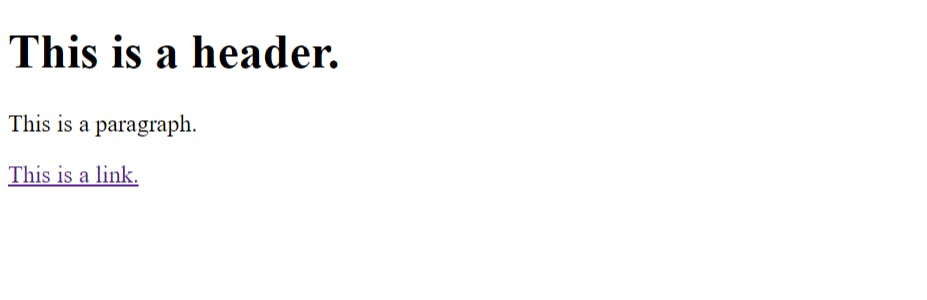
<h1>This is a header.</h1>
<p>This is a paragraph.</p>
<a href="https://example.com">This is a link.</a>
</body>
</html>
Output:
Before Hover-
 While Hover-
Combinator selector🐱💻
A combinator selector is a compound selector that combines two or more selectors. There are four combinators in CSS:
- The descendant combinator
- The child combinator
- The adjacent sibling combinator
- The general sibling combinator
Each of these has a different meaning and use case.
1. Descendant Combinator
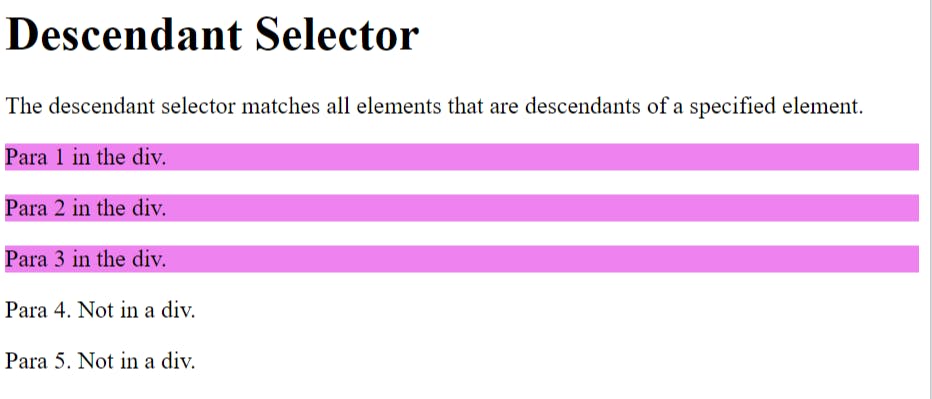
The descendant selector matches all elements descendants of a specified element or any element that is a direct child of another element.
Basic Syntax:
div p {
  background: violet;
}
The following example selects all p elements inside div elements:
<!DOCTYPE html>
<html>
<head>
<style>
div p {
  background: violet;
}
</style>
</head>
<body>

<h1>Descendant Selector</h1>

<p>The descendant selector matches all elements that are descendants of a specified element.</p>

<div>
  <p>Para 1 in the div.</p>
  <p>Para 2 in the div.</p>
  <section><p>Para 3 in the div.</p></section>
</div>

<p>Para 4. Not in a div.</p>
<p>Para 5. Not in a div.</p>

</body>
</html>
Output:
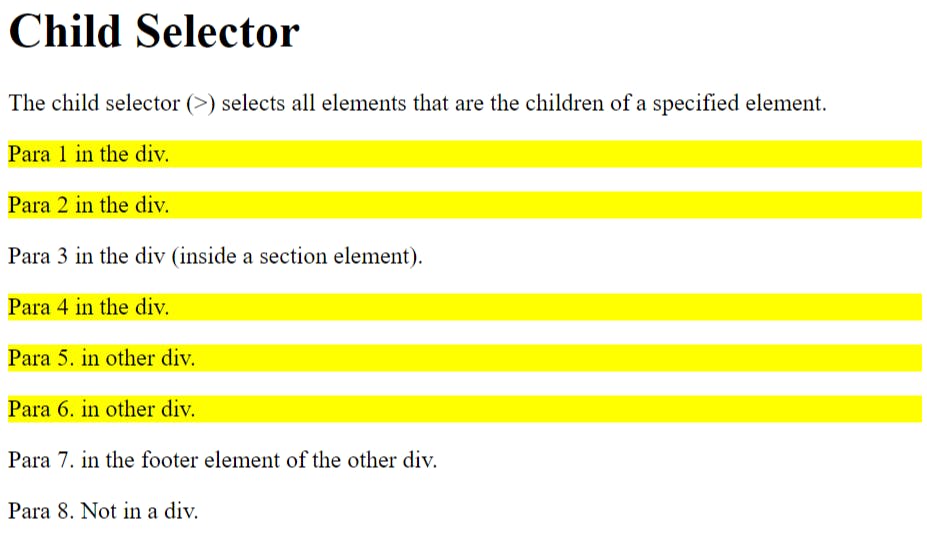
2. Child combinator
The child selector is used to select elements that are direct children of a specific element. For example, if we wanted to select all p elements that were direct children of a div, we would use the child selector like this: div > p.
Basic Syntax:
div > p {
  background: yellow;
}
The following example selects all p elements that are children of a div element:
<!DOCTYPE html>
<html>
<head>
<style>
div > p {
  background: yellow;
}
</style>
</head>
<body>

<h1>Child Selector</h1>

<p>The child selector (>) selects all elements that are the children of a specified element.</p>

<div>
  <p>Para 1 in the div.</p>
  <p>Para 2 in the div.</p>
  <section>
    <!-- not Child but Descendant -->
    <p>Para 3 in the div (inside a section element).</p>
  </section>
  <p>Para 4 in the div.</p>
</div>

<div>
    <p>Para 5. in other div.</p>
    <p>Para 6. in other div.</p>
    <footer>
        <p>Para 7. in the footer element of the other div.</p>
    </footer>

</div>
<p>Para 8. Not in a div.</p>

</body>
</html>
Output:
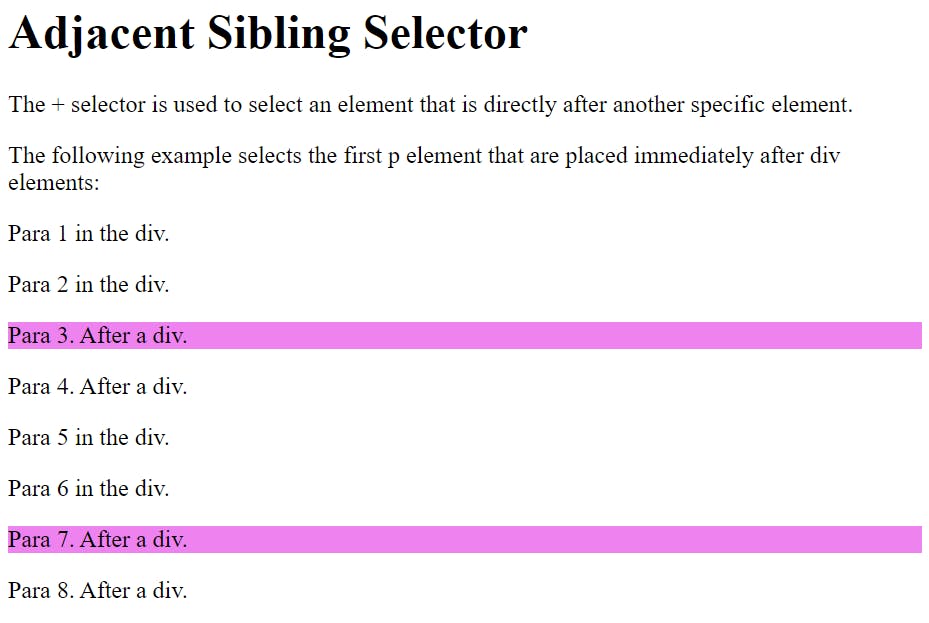
3. Adjacent sibling combinator
The sibling selector is very similar to the child selector, but instead of selecting direct children, it selects elements that are siblings of a specific element. The adjacent sibling combinator selects elements next to each other on the same level, which could be either children or siblings.
Basic Syntax:
div + p {
  background: violet;
}
The following example selects the first p element that is placed immediately after div elements:
<!DOCTYPE html>
<html>
<head>
<style>
div + p {
  background: violet;
}
</style>
</head>
<body>

<h1>Adjacent Sibling Selector</h1>

<p>The + selector is used to select an element that is directly after another specific element.</p>
<p>The following example selects the first p element that are placed immediately after div elements:</p>

<div>
  <p>Para 1 in the div.</p>
  <p>Para 2 in the div.</p>
</div>

<p>Para 3. After a div.</p>
<p>Para 4. After a div.</p>

<div>
  <p>Para 5 in the div.</p>
  <p>Para 6 in the div.</p>
</div>

<p>Para 7. After a div.</p>
<p>Para 8. After a div.</p>

</body>
</html>
Output:
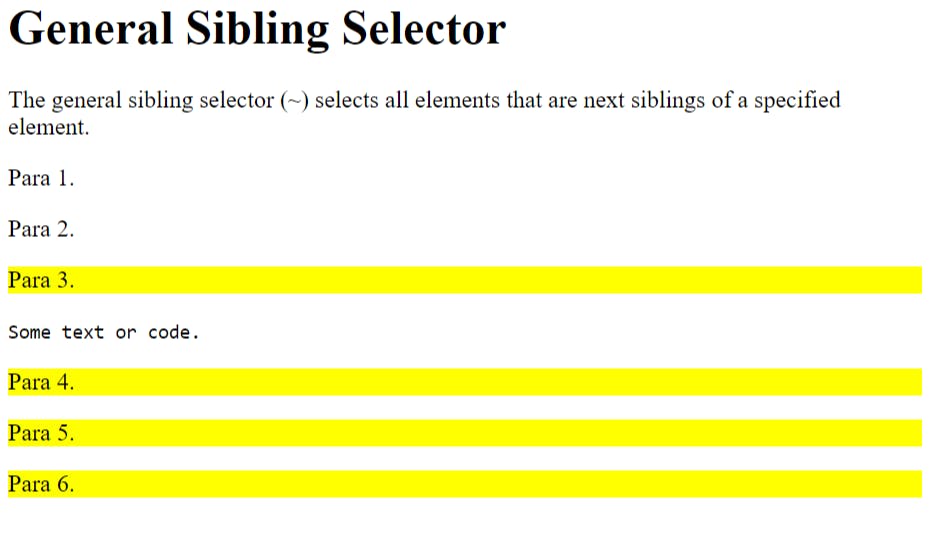
4. General Sibling Selector
The general sibling selector selects all elements that are subsequent siblings of a specified element.
Basic Syntax:
div ~ p {
  background: yellow;
}
The following example selects all p elements that are next siblings of div elements:
<!DOCTYPE html>
<html>
<head>
<style>
div ~ p {
  background: yellow;
}
</style>
</head>
<body>

<h1>General Sibling Selector</h1>

<p>The general sibling selector (~) selects all elements that are next siblings of a specified element.</p>

<p>Para 1.</p>

<div>
  <p>Para 2.</p>
</div>

<p>Para 3.</p>
<code>Some text or code.</code>
<p>Para 4.</p>
<p>Para 5.</p>
<p>Para 6.</p>

</body>
</html>
Output:
So these are the most common and essential CSS selectors; there are more CSS selectors that you can explore while learning to code.